Sunday, May 27, 2012

It was a casserole type of night

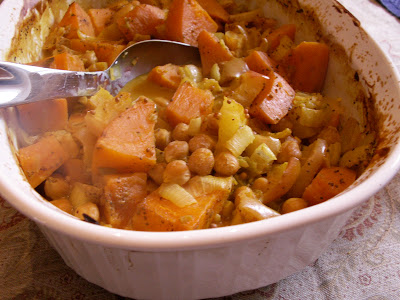
I was searching for something quick to make one evening recently. There wasn't much fresh produce on hand, but I did have one large sweet potato and an onion, plus some ginger root. After checking my cupboards and verifying we had a can of garbanzo beans, I realized I could make this casserole, from Dreena Burton's cookbook Vive Le Vegan!

It was quick to put together (gotta love the recipes that say "mix everything together and cook it), smelled wonderful, and satisfied the whole family (savory enough for the mama, sweet enough for the daddy, beans for the three year old, and sweet potatoes for the nine month old). An absolute win.


Sweet Curry Chickpea Casserole
  • 2 1/2 - 3 cups cooked chickpeas (garbanzo beans)
  • 1 13.5-oz can light coconut milk*
  • 3/4 cup red onion [I used yellow]
  • 1 1/2 cups celery, chopped*
  • 1 - 1 1/2 cups sweet potato, peeled and chopped
  • 1 - 1 1/2 cups apple, peeled and chopped
  • 2 cloves garlic, minced
  • 1 1/2 Tbls freshly grated ginger
  • 1 - 1 1/2 Tbls mild curry paste [I used curry powder]
  • 2 tsp mustard seeds
  • 1 tsp cumin seeds
  • 1/2 tsp turmeric
  • 3/4 tsp sea salt
  • 1/8 tsp allspice

Preheat oven to 375 F. In a large, deep casserole dish, combine all ingredients. Stir through until well combined. Cover and bake for 30 mins. Stir through, cover, and bake for another 30-40 mins, until the vegetables are tender (stir through again once or twice throughout).
Makes 4-5 servings, depending upon accompaniments.

*I had neither coconut milk nor celery,  but I did have a can of cream-of-celery soup and substituted that with grand results. I would like to try the coconut milk version at some point, though. I love coconut curries.


Saturday, May 12, 2012

Matzo Balls

No need to head to the deli, you can get your matzo balls right here. Not even kidding. I have awesome matzo skills.

For the first time ever, and for no apparent reason, I merged two recipes into one, using most of the ingredients from one and the general directions of the other. Two cookbooks, one dish. I don't even know why. Thankfully, it turned out. Below are both recipes.

First, the one I used mainly for the ingredients:

Matzo Balls
from Sara Kasdan's  Love and Knishes: An Irrepressible Guide to Jewish Cooking
6 eggs, separated
1 tsp salt
1/8 tsp pepper
1 cup matzo meal
2 Tbls melted schmaltz 
Beat egg whites until stiff. Beat egg yolks until light. Add salt, pepper, and melted schmaltz to beaten yolks; fold into egg whites. Fold in matzo meal one spoonful at a time. Refrigerate for at least 1 hour. Wet hands and form batter into balls the size of a walnut. Drop into rapidly boiling soup or water. Reduce heat and cook slowly, covered, for about 30 minutes. Serves 12.
Next, the one I used mainly for the instructions:
Matzoh Ball Soup
from Isa Chandra Moskowitz's Vegan with a Vengeance
1 1/2 cups matzoh meal
3/4 tsp salt, plus extra for the boiling water
3/4 tsp ground black pepper
1 (12-oz) package firm silken tofu
8 1/2 cups or so Rich Vegetable Broth
1/4 cup plus 3 Tbls extra-virgin olive oil
1 carrot, peeled
A handfull fresh dill, coarsely chopped
Fresh parsley for garnish
   In a mixing bowl, combine the matzoh meal with the salt and pepper; set aside.
   Crumble the tofu into a blender or food processor, add 1/2 cup of the vegetable broth, and puree until smooth. Add the oil and blend again.
   Mix the tofu mixture with the matzoh meal, making sure that everything is moist. Grate half the carrot into the mixture and mix until it's well distributed. Cover the bowl with plastic wrap and refrigerate for at least an hour and up to overnight. you can't skip this step; it's important in making sure that the matzoh balls will not fall apart when boiled.
   When you are ready to form the balls, fill a large stockpot with enough water to fit all the matzoh balls with minimal touching. Salt the water generously, cover, and bring to a boil.
   Set out a cutting board upon which to line up the formed matzoh balls, and cover it with parchment paper if you have any, to prevent sticking. Also have handy a wet rag to wipe your hands on between forming each matzoh ball.
   Remove the matzoh mixture from the fridge. Form into tightly packed, walnut-size balls and place on the prepared cutting board. When all the balls are prepared, drop carefully into the boiling water, one or two at a time, with a spatula or slotted spoon. Take your time and be careful not to plop one on top of another; they need to remain separate. When all the balls are in the water, cover the pot and DO NOT LIFT LID FOR FORTY MINUTES! Sorry for the caps, just had to stress it. When 40 minutes is up, you can remove the lid. The matzoh balls will have floated to the top and will drop back down when the lid is lifted. This is fun to watch.
   Now they are ready to serve; however, to make them even lighter, you can turn off the heat, cover the pot again, and let them sit in the water for another hour or so. This way they absorb more water and expand a bit more.
   (...) [There's more about making the broth/soup itself, but I didn't use it.]
As I said, I mostly made my matzo balls using Kasdan's recipe (I used eggs) but I didn't use the chicken fat (schmaltz); instead, I felt totally okay substituting with olive oil, since that's what Moskowitz does. And when it came time to mold and cook the balls I appreciated the blow-by-blow instructions (and the CAPS) of the vegan recipe.

We still have matzo meal left over. I'm thinking a few matzo balls might be in store for us this weekend...


Saturday, May 5, 2012

Charosis

Another Passover recipe from last month, because it wouldn't have been Passover without the mortar.

Charosis
from Love and Knishes
2 tart apples
1/4 cup nuts (preferably walnuts) [I used pecans]
1/4 tsp cinnamon
1 tsp honey
1 Tbls Passover wine
Pare and core apples. Chop apples and nuts together finely. Add cinnamon, honey and wine. Makes about 2 cups / Serves 10-12.

 Nothing especially fancy about the recipe, but just because it's basic doesn't mean it's flavorless. On the contrary, this was enjoyed this as much as any apple sauce the consistency of brick mortar can be enjoyed. Which = we loved it. I absconded with the leftovers of work lunches and felt guilty about it. It's that splash of wine, I think, that really kicks it up a notch. Mmmmmm.

Sauce #4 of my goal of 24.

Friday, May 4, 2012

Kimchi

Delving into the wild world of lacto-fermented foods...

from Nourishing Traditions
by Sally Fallon
Korean Sauerkraut (Kimchi)

  • 1 head cabbage, cored and shredded [called for Napa but I used green]
  • 1 bunch green onions, chopped
  • 1 cup carrots, grated
  • 1/2 cup daikon radish, grated (optional) [I didn't have any]
  • 1 Tbls freshly grated ginger
  • 3 cloves garlic, peeled and minced
  • 1/2 tsp dried chile flakes
  • 1 Tbls sea salt
  • 4 Tbls whey (if not available, use an additional 1 Tbsp salt)

Place vegetables, ginger, garlic red chile flakes, sea salt and whey in a bowl and pound with a wooden pounder or a meat hammer to release juices. Place in a quart-sized, wide-mouth mason jar and press down until the juices rise to the top of the cabbage. The top of the vegetables should be at least 1 inch below the top of the jar. Cover tightly and keep at room temperature for about 3 days before transferring to cold storage.

The most difficult part of this recipe was mashing the kimchi down until the juices rose to the top. Took forever, likely because I was using the wrong sort of tool. At the time I was starting to think it was never gonna happen, but eventually it did work, I closed the lid, and then began the waiting. Three days on the kitchen counter and then a few weeks in the refrigerator (our basement is technically 5-10 degrees too warm to be considered cold storage).

We broke-in the kimchi this week. Delicious! Sauerkraut it is indeed (we love it!); the carrots and chile flakes add a fresh note to the otherwise familiar flavor. We'll be using this to top our hot dogs and brats and to accompany our burgers this summer. A big thumbs up.